User accounts allow multiple people to update content on a website in a controlled fashion. This provides a layer of security for content updates.
Users are managed by accounts with Administrator privileges. Each user has the following properties:
Username
This string can be up to 50 characters long and can only consist of letters, numbers, and underscores. No two user accounts can have the same username. The username is not case-sensitive; 'USER1' and 'user1' are treated as the same account.
Full Name
This string can be up to 255 characters long and can consist of any character including spaces. The full name can help identify users with similar usernames.
This is the user's email address and can be up to 255 characters long. The email address is used to send password resets and change notifications.
Password
This string can be up to 50 characters long and can consist of any character including spaces and symbols. The password can be changed by the user or by an Administrator. If the user initiates a password reset, the password is set to a random character string and emailed to the email address assigned to the account. The password is case-sensitive.
Administrator (true/false)
This true/false value determines whether or not the user account is accorded Administrator privileges.
Disabled (true/false)
This true/false value determines whether or not the user account is disabled. A disabled user cannot login to the Content Management System.
Hidden (true/false; reserved)
This is a reserved setting which is not currently used by the Content Manager. Setting it to true or false has no effect.
Group membership
A user can be the member of one or more groups. Groups grant non-Administrator accounts rights to change and publish site content. Group membership is controlled by Administrators.
User accounts that are no longer used to update the site should be promptly disabled or deleted. Users should be encouraged to change their passwords at least once every 90 days to limit the danger of 'loose' passwords being used to gain unauthorized access to the Content Manager. Users should also be encouraged to select unique passwords dissimilar to those used to access other systems.
When users login, they initiate sessions on the server. The session preserves the user's credentials until the user logs out or until the session times out. Session timeouts normally occur after twenty minutes of inactivity. After a timeout, subsequent actions in the editor will require the user to login before proceeding. The current action is saved and will be resubmitted upon successful login to prevent lost changes.
In order to keep the website updated and current, it may be necessary to have multiple people responsible for various parts of the site. To manage these users and their contributions, it may be necessary to restrict these users from publishing their changes until a supervisor is able to review and approve these changes. As a result, various levels of user access have been built in to the User Management features.
There are four types of users:
Administrators
Administrators have full access and full editing privileges. Only Administrators can set up new user accounts and create new pages. Administrators are not required to be members of Groups. They can edit and publish all pages within the site as well as change user privileges.
Editors
Editors have full editing and publishing privileges within the Groups that they belong. Editors cannot edit pages outside of their Group. Editors can be designated the Group Manager for a group. The Group Manager approves the changes made by Authors.
Authors
Authors have editing privileges within the Group that they belong to, but cannot publish their changes. Their changes are sent to the Group Manager for review and publication. They are restricted from performing some actions, such as changing page Titles, and may also be restricted from uploading files and/or images depending on the settings in the /cms/global.asax file.
Readers
Readers are a special user type. They have no access to the Content Manager itself. Reader accounts are used when a website is programmed to have certain areas off limits to the general public. These accounts allow specially authorized visitors to view such areas through a login page. Not all websites use Reader accounts.
[add notes about Restricted pages]
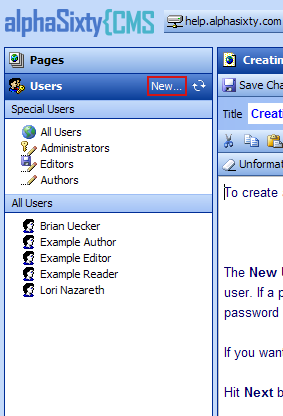
To create a new user, click on the New button of the Users tab.
 |
| 'New...' user button |
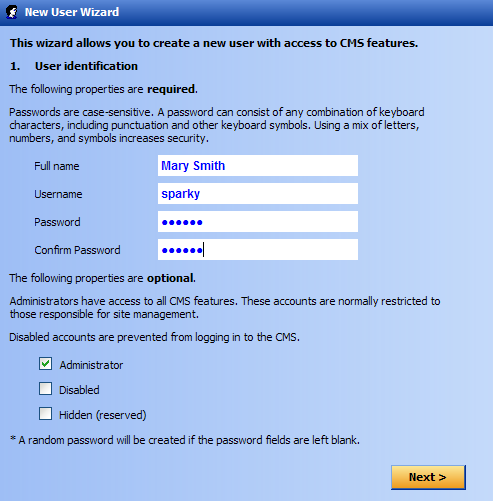
The New User Wizard window appears. Type in the name, username and password for this new user. If a password is not assigned, a 10-character password will be randomly generated for you (the password is shown at the completion of the wizard).
If you want the user to have Administrator access, check the Administrator checkbox.
Hit the Next button.
 |
| New User Wizard step 1 - User Identification |
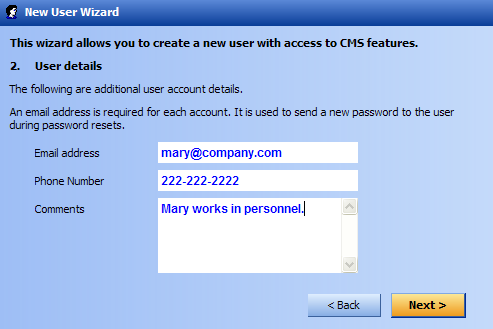
Enter the userâ?™s email address, phone number and any special notes or comments you may want to record. Hit the Next button.
 |
| New User Wizard step 2 - User Details |
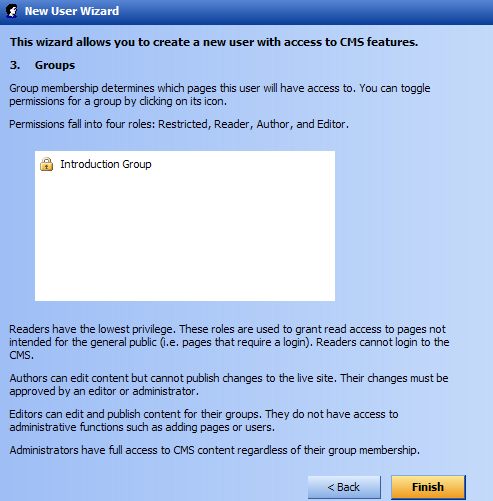
If the user is not an Administrator, the user must be added to an existing group to edit web pages. It may be necessary to create a new group if one does not already exist for the pages you wish to assign access to (see The Groups Screen, Creating Groups).
Click on the icon next to the desired group to specify editing privileges:
= Restricted (the user will be prevented from making any changes)
= Editor
= Author
= Reader
Administrators have access to all web pages regardless of group membership or restrictions.
Hit the Finish button.
 |
| New User Wizard step 3 - Groups |
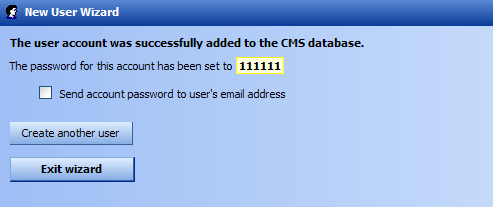
After hitting the Finish button, the new user�s password will appear on the last screen of the New User Wizard.
Check the checkbox if you would like to email the new user his or her password. This password will be sent to the email address that you entered for the user account.
Hit the Create Another User button if you wish to set up additional users or Exit if you are through creating users.
 |
| New User Wizard final screen |
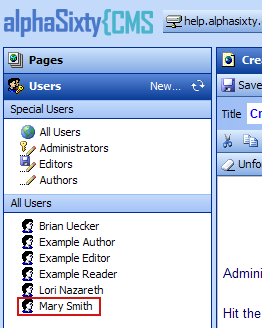
The new user�s name will appear in the user list.
 |
| New user as it appears in the Users tab |
Users can be edited simply by clicking on the user's name. User information appears in the User Properties screen.
Here, all information about the user can be changed including name, username, password, email address, etc. To make changes effective, hit the Save Changes button.
 |
| Delete User and Save Changes buttons |
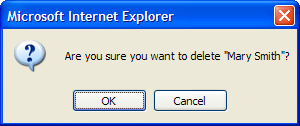
Users can be deleted by hitting the Delete User button. A pop-up dialog box will appear to make sure you haven't hit the Delete button in error. Hit OK to delete or Cancel to go back to editing.
 |
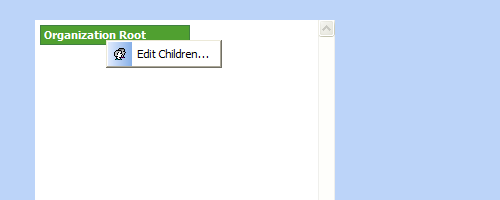
The Org Chart Editor is accessible from the Options tab. It is an optional tool for maintaining a diagram of company organization. Both users and groups can be added to an org chart.
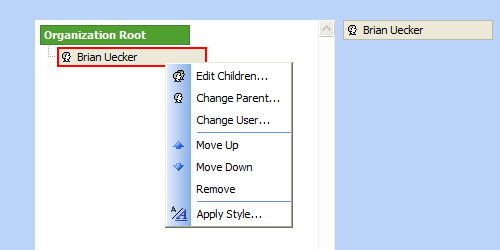
By default, the org chart consists only of the root node for the organization. Adding new nodes to the org chart is done by right-clicking on an existing node and selecting Edit Children... from the context menu.
 |
| The org chart root node and context menu |
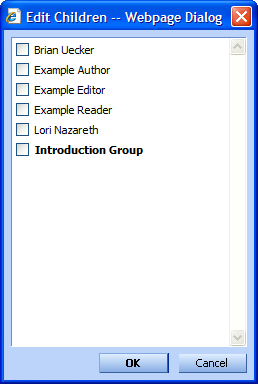
This brings up the Edit Children dialog, which contains a list of users and groups which can be added as children of the current node (if the current node is a user or group, it and all its parent nodes are excluded from the list). To add one or more children, check the boxes next to the desired items.
 |
When a node other than the root node is selected in the org chart, a red selection border appears around it. The currently selected node also appears to the right, along with all parent nodes up to the organization root.
Right-clicking on a user or group node brings up a context menu with additional options for managing its parent, children, and rank.
 |
| User and group context menu |
After adding the desired users and groups to the org chart diagram, optional styles can be applied to the various branches to distinguish them. Both the text and background colors can be configured by selecting Apply Style... from the context menu.
This brings up the Apply Style dialog, shown here.
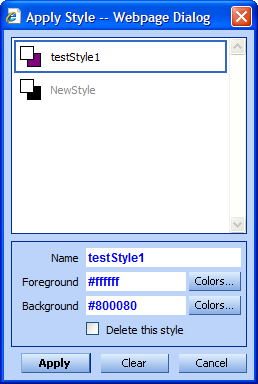 |
To create a new org chart style, select the NewStyle entry and set the desired foreground and background colors. You can enter a hex color value directly or choose one from the color selection dialog.
Once the colors for this style have been chosen, enter a new style name. Style names may include any combination of numbers and letters, but the first character must be a letter. Spaces and other special characters are not allowed in style names.
Finally, click the Apply button to apply the style to the currently selected node. All child nodes which do not have a style already set will also acquire this style.
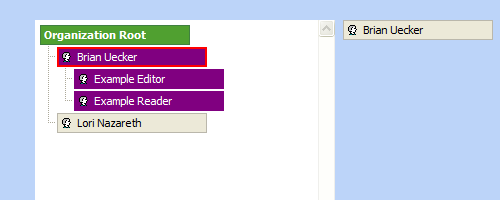 |
| Custom style applied to an org chart node |
To remove a style, bring up the Apply Style dialog again and click the Clear button. Doing so will also remove the style from all child nodes that do not have a style explicitly defined for them.
Once all desired org chart changes have been made, click the Save Changes button.