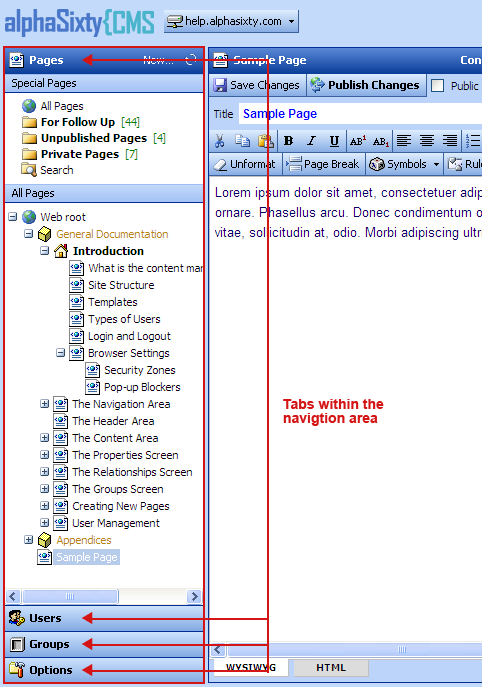
The Navigation Area is the starting point for using the Content Manager. It contains four (optionally five) sections or 'tabs' that can be accessed by clicking on the respective tab, which expands it to fill the full Navigation Area.
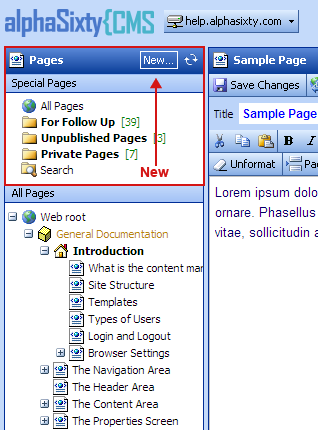
Pages
The Pages Tab is the most commonly used part of the Content Manager. It provides access to every page in the website. Here is where you will edit page content, rename pages, and upload graphics and files.
Users
The Users Tab allows users to edit their account information, such as email address and password. Administrators can use the Users Tab to create, disable, and edit users accounts.
Groups
The Groups Tab allows Administrators to grant Content Manager permissions to other users. Permissions are organized into Groups, which contain users and pages. Each user is given a specific level of access.
Options
The Options Tab includes configuration settings and miscellaneous tools such as the Org Chart editor. Some settings and tools are only available to Administrators.
Articles (optional)
The Articles Tab appears on websites that have special content not belonging within the normal navigational structure. For example, a news page may list a series of news items in chronological order. Each news item can exist as a separate article, making it easier to add them to and remove them from the news page.
These tabs are described in greater detail in the following sections.
The Pages Tab has five selectable views. These views allow access to different sets of pages.
 |
| Navigation area tabs |
When the Pages Tab is active, a New... link appears in the tab heading. This link allows Administrators to create a new page.
 |
| 'New...' button creates new pages |
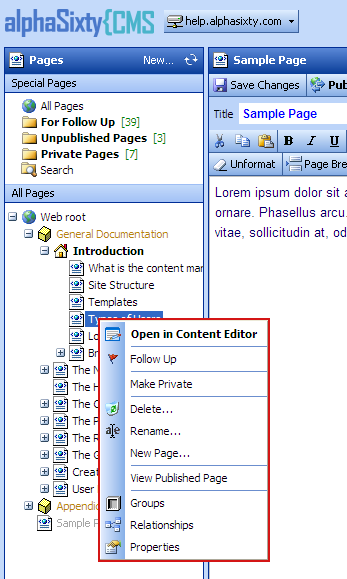
Right-clicking on a page in any of the views displays a context menu showing the actions allowed to be performed on that page.
 |
| Page context menu |
The All Pages view displays all pages of the website in a tree that shows their relationships to each other. This includes pages marked for follow-up, unpublished and private pages, and containers.
The structure of the display emulates the navigation structure within the site. In the example below, under 'Introduction' you will find the subsections within it in the same order they are seen in the online help documentation. These subsections appear in the Introduction section of the online help because they are placed as children of Introduction in the All Pages view.
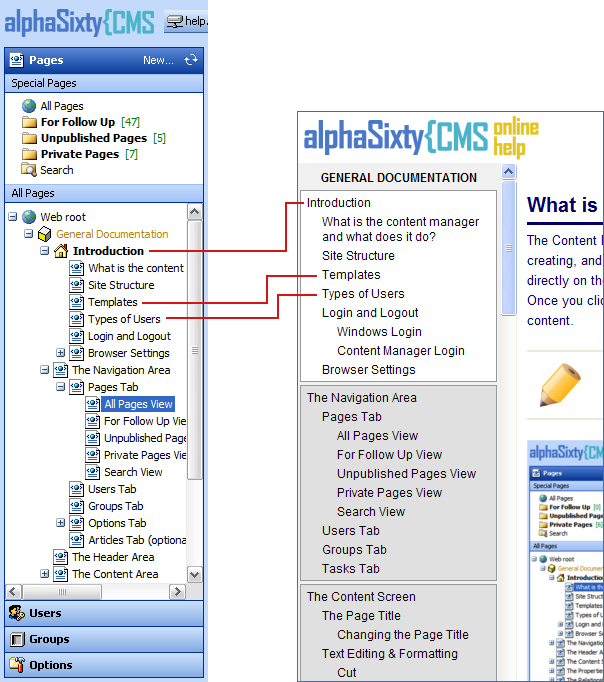 |
Private pages appear as gray text and the home page is marked with a special icon. Containers are shown using a special icon and gold text.
) |
| All pages view |
When Editors and Authors use the All Pages view, they will see icons indicating their level of access to the pages.
This displays all pages that are marked 'private'. Private pages are kept hidden from view by the general public (even if they contain published content). Making a page private allows you to make changes without worrying that visitors to the website will see the page in progress.
By selecting the Search view, a search field appears. You can type in words to help locate specific content in the website. By typing a word or words and hitting the search button, a list of pages containing those words will appear below.
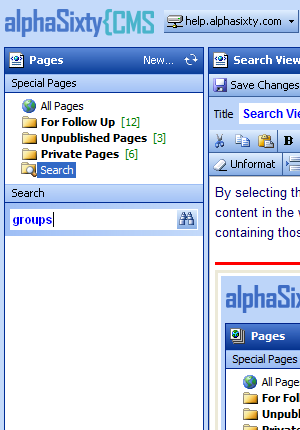 |
| The page search control |
An example of search results:
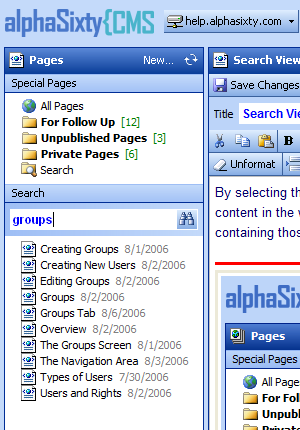 |
| Sample search results (the date denotes version) |
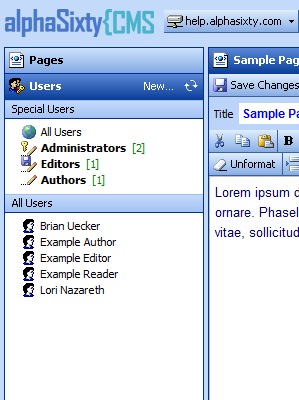
By clicking on the Users Tab in the far left column, the user's information will appear. The default view shows all users, but users can also be viewed by their type, i.e., Administrators, Editors, and Authors. These types can be viewed by clicking on them.
 |
| Users tab |
When the Users Tab is active, a New... link appears in the tab heading. This link allows Administrators to create a new user account.
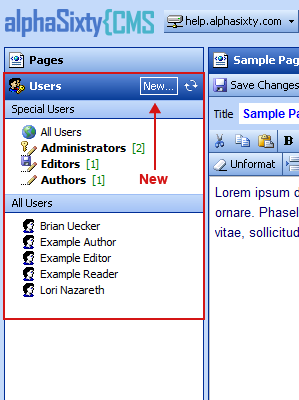 |
| 'New...' button creates a new user |
Right-clicking on a user account in any of the views displays a context menu showing the actions allowed to be performed on that user account.
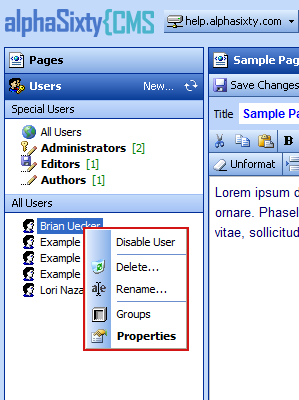
User context menu
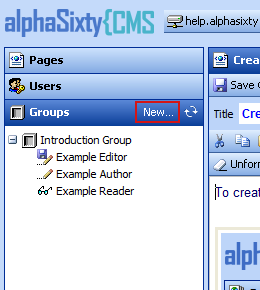
By clicking on the Groups Tab in the far left column, a list of existing groups will appear. Each group can be expanded to show the users who are members of it.
 |
| Groups tab |
When the Groups Tab is active, a New... link appears in the tab heading. This link allows Administrators to create a new group.
 |
| 'New...' button creates a new group |
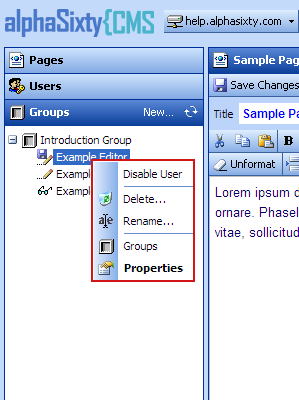
Right-clicking on a group displays a context menu showing the actions allowed to be performed on that group. The user account context menu is also available by right-clicking on one of the group's members.
 |
| User context menu |
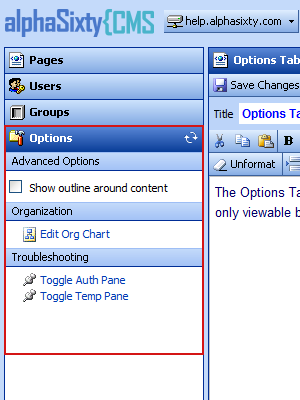
The Options Tab contains access to special settings and miscellaneous tools. Some options are only accessible to Administrators. Options unique to a website are covered in the appendices. Options common to all websites are covered below.
 |
| Options tab |
Show outline around content
Checking this box causes the Content Manager to show an outline around the editable region in WYSIWYG view. This outline shows the exact dimensions the content will occupy on the website. See WYSIWYG & HTML Views for more information about the editable region.
Edit Org Chart
This launches the Org Chart editor, which allows you to manage a hierarchy of users and groups in your organization. This is mainly of use for intranets in which a company org chart is provided for employees. A custom template must be programmed in order to include the resulting org chart in the website. See Maintaining an Org Chart for more information about the Org Chart editor.
Troubleshooting options are available only to Administrators.
Toggle Auth Pane
This toggles a hidden frame that shows the currently authenticated user and auto-renew settings for ASP and ASP.NET pages.
Toggle Temp Pane
This toggles a hidden frame that provides additional messages to help troubleshoot CMS problems.
The Articles tab is an optional section of the navigation pane. Articles are a subclass of normal web pages. Their purpose is to regiment special types of content that appear on the website.
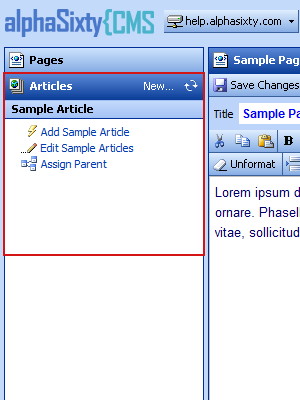 |
| Articles tab |
For example, a projects section might allow visitors to browse through a selection of projects the company has been involved in. For this a project article type would be created. The project article type would feature additional fields for date, category, and other relevant information. Project articles would share common attributes such as template and access permissions, making them simpler to manage than normal pages. Visitors might be given the option to sort the projects by one of the fields, or use search criteria to filter the projects shown.
Article types are designed as needed during website programming. Each article type requires its own template, database table, and Article tab section. More information about article types specific to this website can be found in the appendices to this documentation.