The Content Management System (CMS) is a web-based editing tool that allows for updating, creating, and deleting pages of a website. The CMS makes changes to files and database content directly on the web server. There is no need for additional software or steps to make changes 'live'. Once you click the Publish Changes button for a page, visitors will immediately see the new content.
Note: In order for the Content Management System to work correctly, it needs to be accessed through a PC computer using Internet Explorer 5.5 or later.
) |
| Content Management System (click to enlarge) |
The site structure is determined by managing relationships between pages so that they form a tree (like a family tree). Some pages are attached to the Web root, the starting point of the tree, with additional pages branching out from these.
The relationship that one page has to another is best described using parent/child terminology. In the example shown below the Introduction page has six children. One of these pages, Browser Settings, has two additional children. This makes Browser Settings both a parent and a child page. Some pages have no children but all pages have at least one parent (for top level pages this is the Web root object).
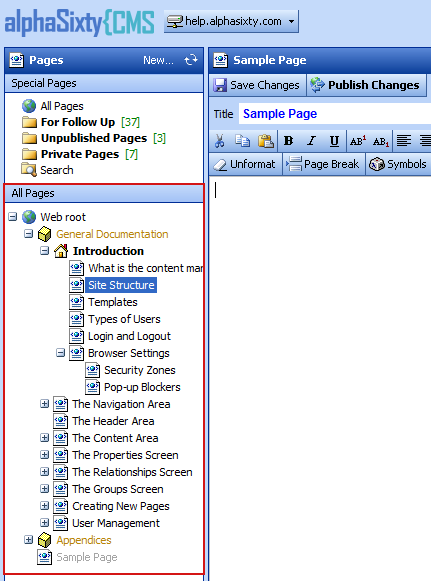 |
| Parent and child relationships shown in All Pages view |
How this structure is translated to the website's appearance is dependent on the programming written for each Template. In a typical case, primary navigation is made up of top level pages, sometimes arranged underneath Containers, and secondary navigation is made up of their children.
Containers are special objects used to organize the website into basic areas. These objects are referenced by special website programming and do not contain content. It is important not to delete or rename Containers. Doing so will break the website navigation. Containers are represented by a small yellow cube (![]() ).
).
 |
| Containers within All Pages view |
While templates will be covered in detail in The Properties Screen, Title & Template, it is enough for now to know that several different templates are used in a website. Templates establish the layout and functionality of a given page. They provide the frameworkâ?”header, navigation, and so on�into which editable content is inserted. Most pages within a website use a standard template named 'Default'.
Pages with unique requirements use specialized templates. These templates are set up in advance by the website programmer and are stored in a special folder of the website.
Examples of Special Templates
A contact page requires extra programming that allows its email form to be submitted and processed by the web server. It would have its own template, which might be named 'Contact'.
A site map requires extra programming to display all the pages in the site in a hierarchical structure, with each page presented as a hyperlink. The template used for it might be named 'SiteMap'.
In both these examples the template in question would apply only to a single page.
While it will be covered in detail in the User Management section, it is important to know that the CMS provides the option to set up user accounts with access and editing rights. There are four types of users and one special access type.
Administrators
Administrators have full access and full editing privileges. Only Administrators can set up new user accounts and create new pages. Administrators can edit and publish all pages within the site as well as change user privileges, and are not required to be members of Groups.
Editors
Editors have full editing and publishing privileges in the Groups they belong to. Editors cannot edit any pages not in their Groups. Editors can be designated Group Manager of a group. The Group Manager approves the changes made by Authors to pages from that group.
Authors
Authors have editing privileges within the Groups they belong to but cannot publish their changes. Their changes are sent to the Group Manager for review and publication. They are restricted from performing some actions, such as changing page Titles, and may also be restricted from uploading files and/or images depending on the settings in the website's /cms/global.asax file.
Readers
Readers are a special user type. They have no access to the Content Manager. Reader accounts are only used when a website is programmed to have certain areas off limits to the general public. These accounts allow specially authorized visitors to view such areas through a login page. Not all websites use Reader accounts.
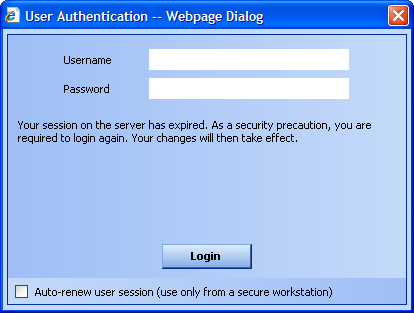
Access to the Content Manager is controlled through a login screen. Before accessing any part of the Content Manager, the user must supply a valid username and password.
 |
Note that you also have the ability to change your password at this time by supplying your current password and checking the Change password box.
If you have completely forgotten your password, you can have a new password generated and sent to you by email by typing your username and checking the Reset password box.
Tip: At the bottom of the login box is a checkbox labelled Auto-renew user session. Checking this box causes the Content Manager to reload a hidden frame before the normal Session Timeout expires. This keeps the session alive as long as the browser window remains open, or until the web application is reset. Web hosting companies often reset the web application daily, so if you leave the browser window open for several hours you will eventually still be asked to login again.
The login session will expire after a period of inactivity. This is called a Session Timeout and is set on the web server. By default the Session Timeout is 20 minutes. After 20 minutes of no activity, the user is required to login again before doing anything else. A pop-up dialog box will appear so that you don't lose your place in the Content Manager.
 |
Expert Note: The Session Timeout can be changed by editing the global.asa and global.asx files in the '/cms' directory on the web site. (This requires FTP access.) The Session Timeout value appears as Session.Timeout =
When ready to leave the website, it is important to Logout. The Logout button appears in the top right corner of the Content Manager.
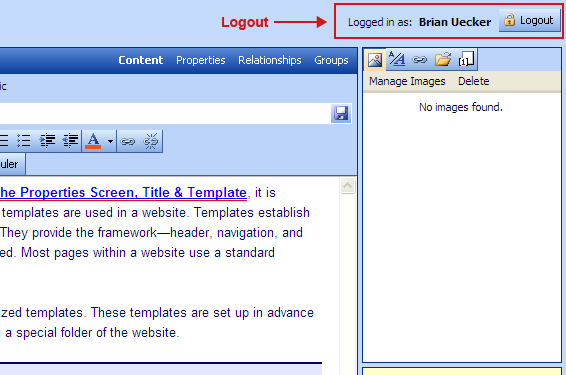 |
| Logout button at top right ends session (click to view full image) |
You should be able to use the Content Manager without problem using Internet Explorer's default settings. However, changing Internet Explorer's default settings or modifying the browser with add-ins such as pop-up blockers may produce unexpected results. Some issues relating to Internet Explorer's configuration are discussed here.
Internet Exporer uses a zone-based security model. Unless otherwise specified, websites fall into the Internet security zone. Other zones are Local intranet, Trusted sites, and Restricted sites. You can find out which zone the Content Manager is running in by looking at the lower right-hand corner of the browser window. In the status bar is a small icon and text indicating the current zone.
) |
| Internet Explorer Security Zone (click to view full image) |
Double-clicking in this area of the status bar brings up the Internet Security Properties dialog. Here you can change the settings for a zone or add a site into another zone. The most common action will be to add the website address to the 'Trusted sites' zone.
You can do this by highlighting 'Trusted sites' and hitting the 'Sites...' button. This brings up a new dialog where you can enter the URL of the Content Manager (for example, https://help.alphasixty.com/cms).
More Information
With the deployment of Windows XP Service Pack 2, Microsoft made changes to Internet Explorer that affect minor aspects of the Content Manager tool. Here are two of them.
Pop-ups that hide the address bar are now required to show the domain name in the title, so for example the Style Manager pop-up may have a title which reads: http://help.alphasixty.com - Style Manager - Microsoft Internet Explorer. If the website is added to the Trusted zone, the title will instead read Style Manager - Windows Internet Explorer.
Another change as of Service Pack 2 is that context menus are forced to stay within the boundaries of their parent browser window. If the website is added to the Trusted zone, context menus are allowed to extend outside the browser window.
Because Microsoft sometimes changes Internet Explorer security through Windows updates and security patches, adding your website to the Trusted zone may resolve unusual problems you encounter after updates are applied.